h g

Wednesday, March 17, 2010

How to Cook : Creamed Chipped Beef


Seeing as how it's St. Patrick's Day (for one more hour), it seems a fitting time to tell you about a new product we have: dried beef! To be honest, I almost decided to just stash all of it in our own freezer and not sell a single package of it. It's that good.

I had intended to make reubens with it. But I kept forgetting to buy the right kind of cheese, and finally I was tired of looking at waiting patiently in the refrigerator. So I made creamed chipped beef instead...simple, fast, easy. Poured over homemade biscuits it was divine! Served with a side of fried eggs - now that the hens are laying a bit again - a perfect weeknight supper.

Creamed Chipped Beef

1/4 c. butter
1/4 c. flour
3 c. milk
16 oz. dried beef, chopped

Melt butter in pan, then whisk in flour until smooth. Slowly whisk in milk. Cook, whisking constantly, until thickened. Stir in beef & heat through. Serve over biscuits, toast, or mashed potatoes.

Labels:

Wednesday, December 16, 2009

How to Cook : Pizza

I really can't believe, out of all the recipe posts I've done, that I've never done pizza! It's an almost-weekly meal at our house during the fall, winter & spring months. (And I'm working on mastering pizza on the grill in the summer.)

When the girls were littler and had fewer activities, every week we had "Friday Night Pizza Night". It was the one night of the week we let the kids drink pop for supper and eat in the living room. These days I just try to make it on any night of the week that we're all home together, and we still drink pop and eat in the living room :)


Assembled pizza's, ready to go in the oven

First, the crust! This is a nice, soft, slightly chewy crust. You can make it in a bread machine, stand mixer, or by hand. Prebake for 5 to 10 minutes, then top with your favorite pizza sauce.

Next, the toppings. We have lots of good things to choose from at the farm. Italian sausage comes already seasoned, just brown it before topping your pizza. And our Italian sausage is MSG-free! Ground pork can be seasoned to your own taste (but here are some ideas to get you started!). Our cottage bacon has a Candian bacon taste, wonderful for pizza! Or how about bacon cheeseburger pizza with regular bacon and ground beef?

Finish it all off with cheese of your choice and bake for 13 to 18 minutes, or until cheese is melted and crust is baked through.


The finished product!

Homemade Pizza
1 cup warm water
2 T. oil
1 T. yeast
1 T. sugar
3 cups all-purpose flour
1 t. garlic powder
1 t. salt
2 t. parmesan cheese
1/2 t. Italian seasoning

Preheat oven to 450 degrees. Mix water, oil, yeast and sugar together. Mix in flour & seasonings. Knead dough until smooth & elastic. If dough is too wet, knead in a little extra flour. If it's too dry, add water 1 teaspoon at a time.

Place dough on baking stone and let rest 10 minutes. Roll out and let rest another 10 minutes (or more, for a thicker crust.) Bake 5 to 10 minutes. Remove from oven, add toppings, and return to oven. Bake an additional 13 to 18 minutes, or until cheese is melted and crust is baked through.

Labels:

Monday, September 14, 2009

How to Cook : Aunt Sandy's Oven Crispy Chicken

I mentioned earlier that we had another batch of chickens butchered last week. Usually I just get them all as whole birds. But our processor does do cut-ups, so I decided to try that out this time and got about two thirds of them cut up.

I was thinking for supper tonight I'd just do the usual - the "Sunday Chicken and Rice" recipe from my church cookbook. I love church cookbooks. They're a collection of everyone's best recipes (so you know they're good) but they're also a little bit of a memory book. Many of the ladies whose recipes appear in this cookbook from 1981 have passed on. Some of them were my Sunday School teachers. I still remember which pew some of them sat in every Sunday. And I remember some of these recipes appearing at monthly church potluck dinners.

As I was flipping through the cookbook looking for that usual recipe, another caught my eye. It's from my Aunt Sandy, who passed away from cancer in (I think) the spring of 2000. I think about her all the time - usually when I'm oiling down my stainless steel sink with vegetable oil, because I remember her saying she did that every night before bed. Or when I'm telling Rafe to stop running in the house, because I remember her telling how she used to say that to her oldest, my cousin Chris, all the time.

I hadn't ever noticed this recipe before, but she was a great cook so I knew I had to try it. And wow. It was good. It was so good that it reminded Rafe we hadn't said the "food prayer" before supper, and he made us all stop right there so he could say it.

We're usually dark meat people, because none of us like dry white chicken breast. But tonight we literally bargained with each other for a hunk of breast meat. It was so tender and juicy. Just wow. That's the best I can come up with. Just wow.

Not only was it good, but it's super easy to whip up. It uses ingredients that I always have on hand, and took no time to prepare. I baked some Bush Delicata Squash - one of the few things to make it out of our garden alive this year - in the oven right alongside the chicken. Some Cottage Cheese Dill bread from the farmers market rounded out our plates.


Sorry, food photography is so not my forte!

So, without further adieu, the recipe!

Aunt Sandy's Oven Crispy Chicken

1 chicken, cut up
1 egg
2 T. milk
2 T. minced dried onion
1 c. instant potato flakes
1/2 T. chili powder
1/4 c. Parmesan cheese
1/4 c. butter

Preheat oven to 400 degrees. Place butter in shallow baking pan and put in the oven while it preheats, until butter is melted. Remove from oven.

Combine onion, potato flakes, chili powder and parmesan cheese in a shallow bowl. Combine egg and milk in another shallow bowl. Salt and pepper chicken, then dip in egg/milk mixture. Then roll in potato mixture. Place skin side down in baking pan and bake 30 minutes; turn chicken pieces over and bake another 30 minutes.

Labels:

Wednesday, April 22, 2009

How to Cook : Eggs Benedict

Once upon a time, a long time ago...I turned 30. And one of my best friends from high school did, too, just 7 days before me. So I flew out to San Francisco to celebrate with her.


Me, left, Susan, right

Susan and I share a love of food. I wouldn't exactly call us foodies, though. I think having Ding Dongs and nacho cheese dip on your favorite foods list disqualifies a person from that moniker. Regardless, we ate some really good food for our birthdays. It was in San Francisco I had a breakfast I'll never forget.

Buckwheat pancakes.

Fried potatoes.

And eggs benedict.


The aftermath.


Fast forward to today. The hens are laying again. I'm in need of an egg dish to fix for supper. I decided to give the home version of eggs benedict a go. With a few changes, of course

Eggs benedict is usually made with Canadian bacon. We have cottage bacon made when we butcher pork, and it reminds me a little of Canadian bacon. I like to use it on pizza, or to lean up a BLT. I thought it would work just fine in my version of eggs benedict.


Then you have to poach your eggs. Simply get a saucepan half full of water boiling then reduce to a simmer. Crack an egg into a measuring cup, then quickly slide the egg from the cup into the simmering water.


Cook 3 to 5 minutes, to desired doneness. The eggs kind of look like jellyfish while they cook.


Remove the egg from the saucepan with a slotted spoon. Place Canadian bacon, or cottage bacon, atop an English muffin. I changed things up a little here, too, and used slices of English muffin bread. It was delicious! Put an egg on top of the bacon, add Hollondaise sauce and sprinkle with paprika.

Hollandaise sauce is simple to make, and is yet another good use for extra eggs. Melt 1/2 cup butter, 1 Tablespoon lemon juice and 1 Tablespoon water in a glass measuring cup in the microwave. Place 3 egg yolks in a bowl, then slowly whisk the melted butter mixture into the egg yolks. Cook this mixture in the microwave 30 to 45 seconds, whisking every 10 seconds, until thickened.

My home version of eggs benedict turned out yummy, and made a wonderful spring meal paired with asparagus.


4 years ago:

Overheard

1 year ago:

Alarmed

How to Cook : Bean & Ham Soup

Labels:

Monday, January 19, 2009

How to Cook : Ham & Cabbage Soup


What is it about peeling and dicing potatoes that calms me, soothes me, centers me?


What is it about making something so simple as soup?


Some humble vegetables, some chicken bones boiled in water to make broth, some salty ham...


Something magic happens when you combine these simple things...a tonic for the soul.


Ham & Cabbage Soup

1 onion, diced
3 potatoes, peeled & diced
2 carrots, peeled & diced
4 cups shredded cabbage
2 cups water
2 cups chicken broth
4 tablespoons butter
1/4 lb. diced ham

Combine all ingredients in stock pot. Cover and bring to a boil. Then reduce heat and simmer 30 to 60 minutes or until vegetables are cooked through. Serves 4-6.

NOTES:
* I doubled the recipe, and then some. I used a whole head of cabbage, which I'm sure was more than 8 cups. And I used 3/4# of ham.

* So I just added equal parts water and chicken broth until it barely covered the vegetables. The cabbage will give off some water, making the final product more "soup-y".

* I used a ham steak, instead of leftover regular ham.


3 years ago:

Practical Farmers of Iowa conference

Easter eggers

Walk the line

2 years ago:

Mist rising at sunset

Salmon Faverolle

1 year ago:

Chicken still life

Munch Munch

Labels:

Wednesday, January 07, 2009

How to Cook : Pork and Vegetable Soup

(and Bread : Round 1)

So before I get to the bread, let's talk about soup. This one is super easy. Last weekend I seasoned a couple of pork roasts with Greek seasoning and slow roasted them - probably 4 to 6 hours at 325 degrees. One roast I shredded for sandwiches. The other I cut into cubes.


If you're starting with an uncooked roast, you can cube it and then brown in a skillet with a couple tablespoons of oil. Then just toss it in the crockpot with a few diced carrots, a diced onion (or be lazy like me and use a handful of dehydrated onion), a can of diced tomatoes, 1/2 jar of salsa, equal parts frozen corn and green beans, a couple cups of water, beef bouillon granules, garlic, salt and pepper. Cover and cook on low 8 hours.


Once the soup was going, it was time for the bread. The directions say to take your big batch of dough out of the refrigerator and cut off about a one pound piece.

Okay, a confession. The part I was most nervous about was hacking off a hunk of dough that was about one pound. I'm just not good at eyeballing. In junior high I did the long jump, and I could never eyeball that point where I should stop running and jump. Silly, right? But that's what you get when a computer programmer bakes.

Anyhoo, put your anal retentive tendencies aside and simply hack off a hunk of dough. Dust it with a little flour and shape it into a ball by pulling the sides down underneath of it. That will make the bottom all bunched up and bumpy, but it's okay. It will smooth out as it rises and bakes.


Then it's supposed to rise for 45 minutes, and a commenter yesterday pointed out that the authors' website says to let it rise more like an hour and a half.

Me? I let it rise something like 3 hours because I went back upstairs to work and promptly forgot about the bread. But it all turned out okay.

After the rise, I dusted it with rye flour and then slashed a tic tac toe pattern in the top with a serrated knife.


A 40-minute bake in a 450 degree oven and we had this:


The family loved it, and it went perfectly with this:


The only problem? I should have made 2 loaves. One wasn't enough for the 5 of us.

Tomorrow I'll eyeball another hunk of my batch of dough and use it to make olive bread. Stay tuned...

Pork & Vegetable Soup

2 pounds boneless pork roast, cubed
2 tablespoons oil
3 medium carrots, diced
1 onion, diced
16-oz. can diced tomatoes, undrained
8 oz. salsa
2 cups water
1-1/2 cups frozen corn
1-1/2 cups frozen green beans
1 clove garlic, minced
2 tsp. beef bouillon
1/2 t. salt
1/2 t. pepper

Brown pork in oil. Add to crockpot with remaining ingredients. Cover and cook on low 8 hours.

NOTES:
* I used a handful of dehydrated onion in place of the fresh onion
* I didn't have a can of tomatoes, so I used a 16-oz jar of salsa and 2 extra cups of water instead
* I didn't have any beef bouillon, so I just left it out and added a little extra salt
* I almost always use granulated garlic in place of fresh minced garlic because I'm lazy
* I cooked on high for 4 hours, instead of low for 8 hours.


1 year ago:

Fence

Head on over

On the farm 01.07.08

Labels:

Tuesday, December 09, 2008

How to Cook : Ham Alfredo


Sometimes the best recipes evolve as a direct result of laziness. I was hungry for carbonara. But the thought of schlepping out to the garage, digging through one of my messy freezers for bacon, defrosting and cooking said bacon...it was more than I had the energy for on a Monday night after work.

I know, I know, cry me a river.

Matt suggested spaghetti and alfredo. That sounded like a better match for my energy level. Well, him cooking would have been the best match for my energy level, but alas he was busy stickering meat.

And as I stood there at the stove whisking the alfredo sauce, inspiration struck. There was leftover ham in the refrigerator! Ham...bacon...they're both smokey, and salty, and come from pigs. I diced it up and threw it in the sauce.

It wasn't carbonara, but it was close enough and it was delicious!

Ham Alfredo

1/4 c. butter
3 T. flour
3 c. milk
1/2 c. grated Parmesan
leftover bits of cooked ham
parsley, to taste

Melt butter in large skillet or saucepan. Whisk in flour. Gradually whisk in milk. Cook and stir until thickened. Add Parmesan; cook and stir until smooth. Add ham bits and parsley; heat through. Serve over your choice of cooked pasta.

If your sauce gets too thick, just whisk in additional milk until the sauce is the consistency you want.


2 years ago:

Wish list

1 year ago:

Random cool pictures

Labels:

Wednesday, December 03, 2008

How to Cook : Pumpkin Pie

I mentioned in my last post that Olivia & I made pumpkin pies. We started by taking a couple of small pie pumpkins and cutting some slits in them simply by sticking a knife into each one a few times. Then we put them on a cookie sheet and roasted them in a 325 degree oven for a couple of hours. They're done when you can stick the knife in and feel that the flesh is soft all the way through. Peel the skins off - I love this part! - then let the pumpkins cool. We left ours overnight.

The next morning we cut each one in half and scraped the seeds out. In retrospect I think we wouldn't have had to do that. We could have just put the whole works into the food mill and let it sort out the undesirables. But we did, and then we just cut the pumpkin flesh into chunks and fed them through the food mill.


If you don't have a food mill, then scrape the seeds out and run small pieces through a food processor or blender. If you do it this way you may have to add a bit of water to get a smooth consistency.


Then it was time to make the crust. We're still learning how to make a good pie crust, but these didn't turn out too bad. I've found that making the dough in the food processor works best for me - it keeps me from overworking the dough.

Then simply make the filling, using your pureed pumpkin, pour in the crusts and bake. Easy as...cake. (Ha! Thought I'd say "pie", didn't you?)


Olivia sporting her homebaked pie and her new glasses

Pie Crust
2 cups all-purpose flour
1 tsp. salt
2/3 cup cold butter or lard
1/4 cup ice water

Put flour & salt in food processor. Cut butter into chunks. Add 1 chunk at a time to food processor, and pulse a few times after adding each chunk. Add water and pulse until small crumbs form. At that point we gave it the "pinch test". Pinch a little bit of dough together. If it feels too dry and doesn't hold together, add another teaspoon of water, pulse a few times and then test again. Repeat until you have a dough that feels right. It should hold together but not be sticky. It's one of those things you just kind of have to do a few times until you get a feel for it.

Roll dough, on floured board, into a circle about 1" larger than your pie pan. Fold dough in half, lay into pie pan, then unfold and ease loosely into the pie pan. Don't stretch it! Trim the excess dough from around the edge with a serrated knife.

The pie recipe we used is from my grandma's Betty Crocker cookbook circa 1956:

Pumpkin Pie Filling
(for a 9" pie)

1-3/4 c. mashed cooked pumpkin
1/2 t. salt
1-3/4 c. milk
3 eggs
2/3 c. brown sugar
2 T. granulated sugar
1-1/4 t. cinnamon
1/2 t. ginger
1/2 t. nutmeg
1/4 t. cloves

Beat all ingredients together. Pour into pie crust. Bake 45 to 55 minutes at 425 degrees, or until a silver knife inserted 1 inch from the side of the filling comes out clean. The center may still look soft but will set later.


3 years ago:

Tis the season

O Christmas Tree

Lazy, pampered chickens

To tell the truth...

2 years ago:

Tree '06

So much for quiet

Cold

1 year ago:

Daily bread

Loaded, the back story

Daily bread details - Part 1

Daily bread details - Part Deaux

Winter pig chores

Labels:

Thursday, October 09, 2008

How to Cook : German Pork Chops

Can you tell it's fall? Two food posts in one week! My family's tummies are so happy.

I know I've mentioned this before, but one of my go-to cookbooks is the More-with-Less Cookbook. If the cookbook police came around and demanded I give up all my cookbooks but one, this one would be on the short list. That's how much I love it. Today's recipe comes from that cookbook.

Last weekend we harvested the rest of our potatoes, so I've been revisiting all of my favorite potato comfort foods. This recipe combines potatoes and pork chops, cooked in one pan, for a simple but tasty dish that works for Sunday dinner or a weeknight supper.

You can vary the recipe according to the number of people you're serving. Basically, you'll need one pork chop and one medium-sized potato per person. I used 6 of each tonight. Thinly slice the potatoes and layer in a 9x13 cake pan. Season with salt, pepper, and caraway seed. Lay the pork chops on top of the potatoes, and season them the same way.


As an aside...how many of you have one of these:


I think we may have got this as a wedding present, 16 years ago. And it's still one of my favorite kitchen tools. It makes quick work of slicing potatoes, or shredding massive amounts of zucchini.

Anyhoo.

Next dump a can of sauerkraut on top of the chops, and season with still more caraway seeds. You just can't have too many of those little buggers. The sauerkraut I used was actually a sauerkraut relish I had leftover from a bratwurst cookout. It was languishing in the refrigerator, crying out to be used up and put out of its misery already. But you can just use a regular ol' jar of sauerkraut.


Add 1/3 to 1/2 cup of water, depending on how many chops & potatoes you've used. Cover with foil and stick it in the oven.

Then go watch 12 games of volleyball.

The recipe instructs to bake at 350 degrees for an hour. Since I knew I was going to be gone a few hours, I baked them at 325 degrees for 2-1/2 hours. Gotta love a recipe with that kind of flexibility! Either way, remove the foil and bake 15 minutes more to brown the chops a bit.


German Pork Chops
adapted from the More-with-Less Cookbook

6 pork chops
6 medium potatoes, peeled & sliced
1 can sauerkraut

Layer potato slices in 9x13 cake pan. Season with salt, pepper, and caraway seeds. Lay pork chops over potatoes. Season again with salt, pepper, and caraway seeds. Layer sauerkraut over chops, and season again with caraway seeds. Add 1/5 cup water. Cover pan with foil, and bake at 350 degrees for an hour. Remove foil and bake 15 minutes longer.


For dessert, we were treated to an apple pie made from scratch by Olivia! She attended a 4-H pie-baking workshop after school today, and her very first attempt was quite delicious. Her grandma Lola would be so proud!


3 years ago:

Up, up and away

1 year ago:

"family time"

Labels:

Thursday, October 02, 2008

How to Cook : Swiss Steak

We had our first frost last night, but haven't yet succumbed to turning on the heat in our house. But I love this time of year when I can run the oven, the crockpot, the stovetop, and whatever other heat-generating appliance my heart desires! So when Becky left a comment the other day, asking for a round steak recipe, I said right out loud, "Thank you! Now I know what to make for supper!" And I immediately dug out my trusty crockpot.

This recipe fits the lazy-cooking-from-scratch style I love so much. It comes together in a hurry (I fixed it during my lunch break), and cooks away while you go off and watch 12 games of volleyball.

Round steak usually comes as a largish slab, with ribbons of fat around the edges and sometimes through the middle. It's a cut of meat where it's easy to cut that fat away if you wish. We only have top round cuts made (the bottom round gets ground in with the hamburger, making it leaner) and we always have the locker tenderize ours.


Start with 2 to 3 pounds of steak, and cut it into individual serving sizes. Then mix flour, salt and pepper together and coat the steak pieces with the flour mixture.


Plop it into a pan of melted butter and brown each piece on both sides. Then transfer to your crockpot.


The recipe calls for a can of cream-of-mushroom soup. I didn't happen to have any on hand, but do you know how easy it is to make your own? Just melt 3 tablespoons of butter in a saucepan, and whisk in 3 tablespoons of flour until smooth. Then whisk in 1 cup of milk and heat until the mixture is thickened and bubbly. Then dump in a can of mushrooms.

To either the canned or scratch version of your soup, add 1-1/3 cups of beef broth (or 1-1/3 cups water + 1/2 T. beef boullion granules), a couple cloves of minced garlic and a chopped onion. Mix all together until blended and then pour over the round steak in the crockpot. Cook on low 8 hours or high 4 hours.


Serve the meat and the sauce over pasta. I usually use egg noodles, but I happened to have these curly things in the cupboard and they worked just dandy.


Yum! Hot, beefy, creamy goodness!

Swiss Steak

2 to 3 pounds round steak
3/4 cup flour
1 t. pepper
1/4 t. salt
2 T. butter
1 can cream of mushroom soup
1-1/3 c. beef broth
1 onion, chopped, 2 cloves garlic, minced

Trim fat from steak and cut into individually-sized pieces. Mix flour, salt and pepper in a shallow pan. Coat steak pieces in flour mixture. Brown steak pieces in melted butter. Transfer to crockpot. Combine remaining ingredients and pour over steak. Cover and cook on low 8 hours or high 4 hours, or until meat is tender and cooked through.


2 years ago:

Happy October!

Nerve wracking

1 year ago:

Saving the world

Labels:

Tuesday, April 22, 2008

How to Cook : Bean & Ham Soup

I told you I was going to tantalize you with pork recipes, and an ulterior motive of selling the hogs we're taking to the butcher next Monday the 28th. So far it's working, because we've sold 2 this week! So here's another recipe to further tempt you.

Soup season is coming to an end, but I'm still craving it on these rainy April days. And yet these rainy April days are some of the busiest, with all of the spring animal babies, the yard work and gardening to be done, the kids' overlapping sports (track, softball, volleyball, soccer), besides the day jobs and the normal work of keeping the household together. So there's no time for the involved soups of winter. Bean & ham soup fits the bill perfectly!


You'll need a one pound bag of dried beans. Pretty much any kind of beans will do. The bags with all different kinds of beans, usually called a "soup mix", are nice. But our little local grocery store doesn't always have those. In that case I just use northern or navy beans.

Put the beans in a colander and rinse them under cold water. Pick through them real quick and pick out anything that looks objectionable. Then dump them in the crockpot.


I use smoked ham hocks for this soup, but you could also use the leftover bone and meaty bits from Sunday's ham dinner. Throw that in the crockpot with the beans.

Some bean soup mixes come with flavoring packets. You can sprinkle that over the ham & beans if you want. I didn't notice when I bought them, but the beans I bought came with a Creole seasoning packet. That didn't sound too great to me, so I ditched it. Instead I seasoned the soup with a tablespoon of salt, a teaspoon of granulated garlic, and a couple of bay leaves. If you're watching your sodium intake, omit the salt entirely. The ham hock is salty enough.


Cover the whole mess with about 3 quarts of water. Cook in the crockpot on high 8 to 10 hours. Newer crockpots cook hot enough that 8 hours is sufficient. Older crockpots cook at a lower temperature and may need another hour or two to get the beans cooked through.

Before serving, remove the bay leaves and discard. Remove the ham hock, shred the meat from the bone, and add the meat back into the soup. Give it a good stir and it's ready to eat!

So, hungry now? If you're finally ready to put a half or whole hog in your freezer, just email themillers92 (at) osage (dot) net to get on the list for Monday!

Bean & Ham Soup
1 ham hock or leftover ham bone & meat
1 pound bag dried beans
1 T. salt (optional)
1 t. granulated garlic
2 bay leaves
3 quarts water

Rinse and pick through beans. Place in crockpot with ham hock and seasonings. Cover with 3 quarts water. Cook on high 8 to 10 hours.

Labels:

Friday, April 18, 2008

How to Cook : Ground Pork


Ground pork is an under appreciated meat. I only just recently started cooking with it myself. It makes great maid-rite type sandwiches. It's real tasty in place of ground beef in all kinds of Italian dishes. And I like to brown it with some seasoned salt as a pizza topping.

I've been wanting to experiment with seasoning plain ground pork for various types of sausage. Tonight was the night. I tried an Italian sausage recipe, and a breakfast sausage recipe, and used them to top a couple of homemade pizzas.

Let me tell you...it was easy, and it was delicious! I had to make some modifications because I didn't have all the ingredients called for in the recipes I started with. For example, the Italian sausage recipe calls for anise or fennel seed. The only seeds I had in the house were caraway seeds, so in they went. But experimenting was half the fun! And now the wheels in my brain are turning with the possibilities for variations on the theme. I'm on a mission to create my very own secret family recipe :)

But I'm not there yet, so I'll share with you my starting recipes. The great thing about making your own sausage is that you can omit unwanted ingredients such as msg or other things you might be allergic to, you can control the salt content, and you can make it as spicy or as mild as you like!

Each of these seasoning recipes is enough to season one pound of ground pork. To save time you could multiply the recipe, store it in a ziplock bag, and then just take out the amount you need each time. I put the ground pork in a bowl, and mixed the seasoning ingredients in a separate bowl. If you want you can run your seasonings through a spice grinder or coffee grinder. I prefer the au naturale quality of having bits of seeds and flakes of parsley visible in the final product.

And also I had a 6-year-old boy whiiiining about how staaaaaarving he was. So I took all shortcuts possible.

Sprinkle the seasonings over the meat and get ready to get your hands messy! Squeeze and mix the seasoning all through the ground pork with your hands. For optimum flavor you can then let it set in the refrigerator overnight so that the flavors really meld into the meat. I'm not that much of a planner-aheader, (and there was the aforementioned 6-year-old boy), so once I had it all mixed in good I immediately browned the meat. You could also shape the seasoned pork into patties and fry them.

So go ahead and experiment, get creative! Then come back here and let me know what you came up with...or keep your new recipe a family secret if you want ;)

If you're interested in a half or whole hog, just email themillers92 (at) osage (dot) net. Last spring butchering date is Monday April 28!

Italian Sausage Seasoning
1 t. ground black pepper
2 t. dried parsley
1-1/2 t. dried Italian seasoning
1 t. garlic powder or 2 T. fresh minced garlic
3/4 t. crushed anise seed or fennel seed
1/2 t. paprika
1 t. minced dried onions
2 t. salt

Combine spices. Run through a grinder, if desired. Mix well into 1 pound ground pork. Refrigerate up to 8 hours, if desired. Brown meat, or shape into sausage patties and fry.

Notes: As I mentioned, I didn't have anise or fennel seeds, so I substitued caraway seeds. Also I thought 2 t. salt made the final product too salty, so next time I will only use 1 t.


Breakfast Sausage Seasoning
1/2 T. brown sugar
1 t. dried sage
1 t. salt
1/2 t. ground black pepper
1/8 t. marjoram
pinch crushed red pepper flakes
pinch ground cloves

Follow directions given for Italian Sausage above.

Notes: I only had ground sage, so I substituted 1/4 t. for the dried sage. I didn't have any marjoram, so I substituted 1/8 t. ground thyme there.

Labels:

Tuesday, March 04, 2008

How to Cook : Ham Steak

We will be butchering hogs soon! Choose either March 17 or March 24 butchering date. So many good things to fill the freezer - ham, bacon, sausage patties (I've been eating these every day for breakfast this week), pork roast for kahlua pork. Email themillers92 (at) osage (dot) net to reserve your half or whole hog!

Ham steak is a great thing to have in the freezer. All the taste of ham, less of the cooking time! You do need to cook ham steak to 160 degrees, just like a ham. But whether you bake it, grill it, fry it, or microwave it, it takes a lot less time than cooking a whole ham. Great for a quick and easy weeknight supper, or a Saturday lunch.

I mentioned in my How to Cook : Ham post an easy glaze you can use to spruce up ham steak. But here's another one of my favorite ham steak recipes - Ham and Cabbage.

All you need is this:


plus this:


and some rice and you'll hear your middle child mumbling, "Hm, this is good!"

Start with a head of cabbage. Chop the whole thing up, throw it in a big skillet and drizzle it with some oil. I love sesame oil - it gives a nice Asian flavor. I was out and didn't want to run to town for more, so I just used olive oil and added salt, pepper and garlic powder. Get it started over medium-high heat, and put the lid on to get some steaming action going. Give it a stir every once in a while.

While that's starting to cook, cut the ham steak into cubes. Then you have a couple of options. You can throw it right into the pan with the cabbage. This is what I do, trying to make it easy on my hubby who does the dishes. The water in the ham steak will help cook the cabbage. But you could also fry the ham steak cubes in a separate skillet and mix everything together at the end.

Then just spoon some rice into a bowl, top with the stir fried cabbage and fried ham steak cubes, add a little soy sauce and - voila! - a delicious little rice bowl.


Ham and Cabbage
1.5# ham steak, defrosted and cut into cubes
1 head cabbage, chopped
rice, cooked
soy sauce

Place cabbage in a large skillet. Drizzle with sesame oil. Or drizzle with olive oil and season to taste with salt, pepper and garlic powder. Stir fry over medium-high heat. Fry ham steak cubes in a separate skillet, or add to cabbage and cook with cabbage. Serve ham steak cubes and cabbage over rice and season with soy sauce.

Labels:

Monday, February 25, 2008

How to Cook : Ribs

Another day, another day off school. And then the predicted storm totally missed us. The good thing to come of it was that the girls' dance classes were cancelled, so I had time today to cook ribs and blog about them. Just for you!

Ribs are another one of those things that, for a long time, I was intimidated by. I had many rib failures before finally finding a recipe that fits my lazy cooking from scratch lifestyle. Indeed the recipe is not only lazy, it's perfect for a lazy weekend. Low and slow is the key here. Low heat and me cook you long time.

I'm starting to drool just thinking about it.


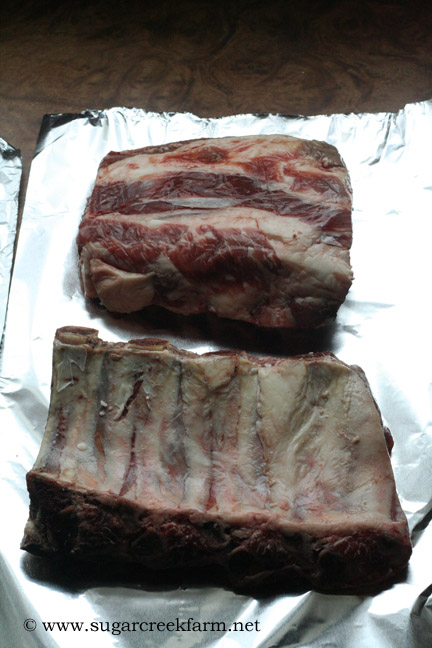
Above I have about 4 pounds of beef short ribs.


And here I have about 2 pounds of pork spare ribs. There's another couple of pounds hiding outside of the shot. Allow about a pound and a half of beef ribs per person, or one half to one pound pork ribs per person.

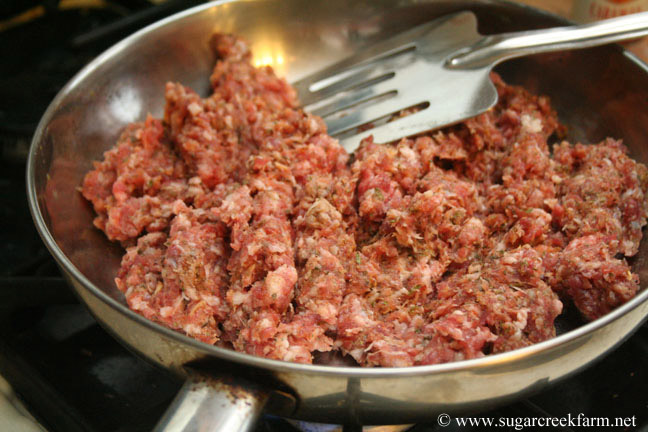
First things first. The rub. The rub is one of the things that was missing from my early attempts at ribs. This recipe makes enough rub for all 8 pounds of the ribs I fixed today. If you're going to fix fewer ribs, just throw the leftover rub in a ziplock freezer bag and throw it in the freezer for next time.

The rub includes a couple of tablespoons of Essence of Emeril. You can buy this in the store pre-prepared. But Emeril has been kind enough to share his essence recipe with you! So you can also make up a batch of that, and store the leftovers in the freezer.

One thing about living in the country is that if you're out of a certain ingredient, you try to make do with something else rather than run to the store. I was out of some of the components for Emeril's essence recipe. So I used "Organic Delta Rub" from Excalibur Seasonings instead. I was also short on cumin, so I substituted curry powder for some of that. Don't be afraid, get crazy, get creative, experiment!


I sprinkle the rub over the ribs, and then pat and rub it in so that it sticks to the meat.


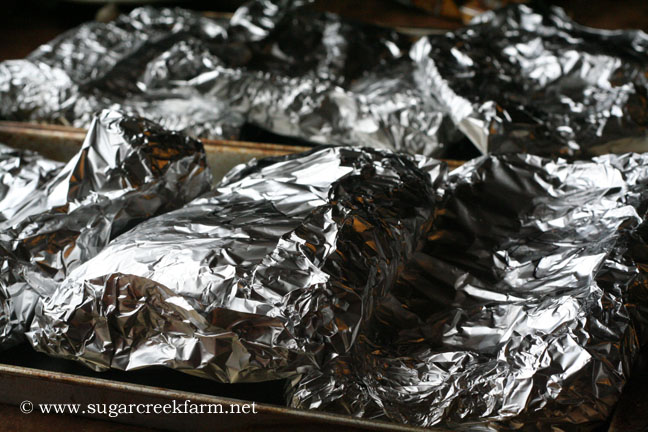
Wrap the racks of ribs in foil, and lay on cookie sheets. Stick in a 275 degree oven, along with a pan of water to keep them moist, and then just walk away. Read the paper. Clean something. No, on second thought, don't do that. This is supposed to be a lazy weekend. Watch a movie. Or two. Whatever you do, leave these puppies alone for 4 to 5 hours!


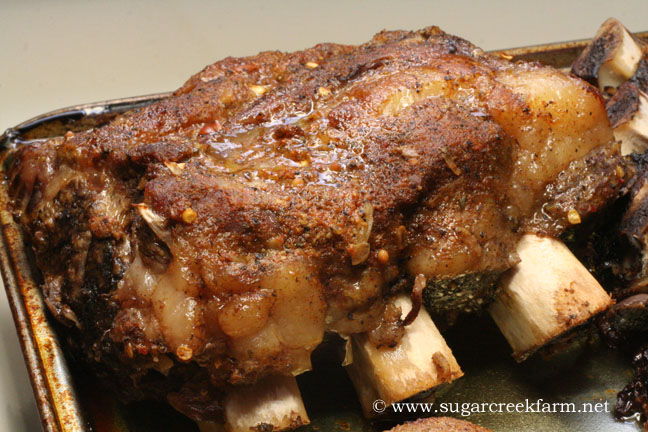
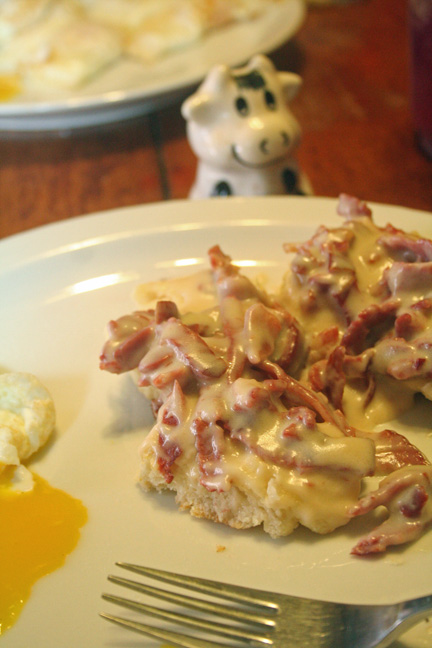
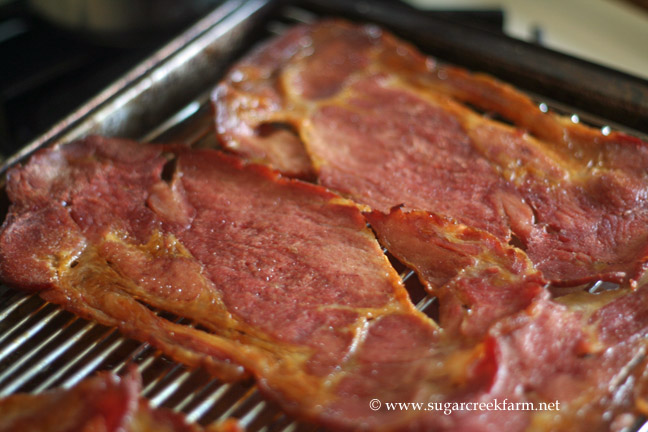
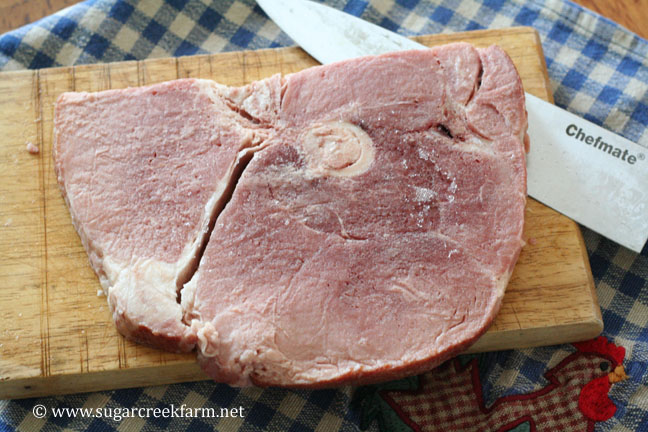
When they come out of the oven they will be moist and the rub will be a nice golden color, fused right into the meat. These are the beef ribs.


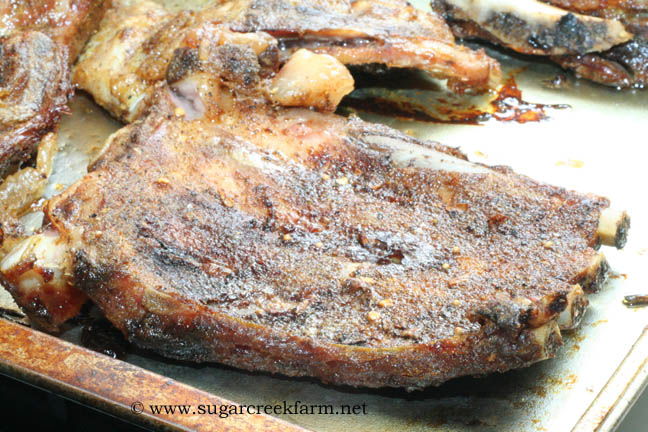
And these are the pork ribs. Remove the ribs from the foil at this point.

Now you can stop right here and eat them just like this if you want. A friend of ours does this, and sets the barbeque sauce out so that people can choose to use it or not.


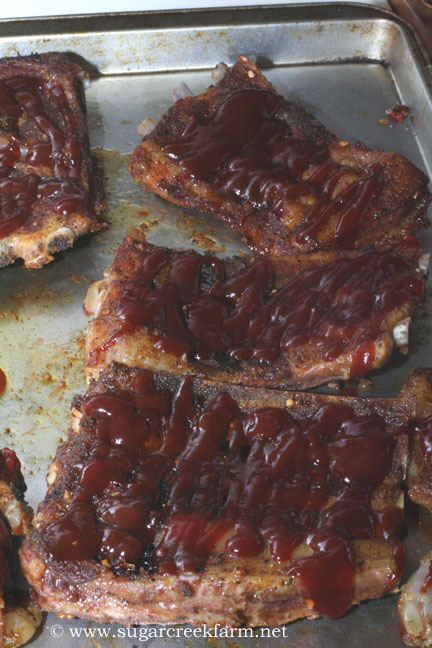
Or you can coat the ribs right now, both sides, with your favorite barbeque sauce. Then stick them back in the oven, without the foil, for 10 or 20 minutes. Just long enough so that the barbeque sauce heats up and starts to carmelize a bit.

Our favorite sauce is Famous Dave's. However the first ingredient listed in Famous Dave's sauce is - you guessed it - high fructose corn syrup. So then I was going to make my own. But they all call for ketchup, and any ketchup I looked at in the store had - you guessed it - high fructose corn syrup. So I threw my hands up in despair and used up the last of the Famous Dave's I had in the fridge. My quest for the perfect sauce continues. If you have tried-and-true barbeque sauce recipes, post them in the comments or post on your blog and leave a link in the comments.


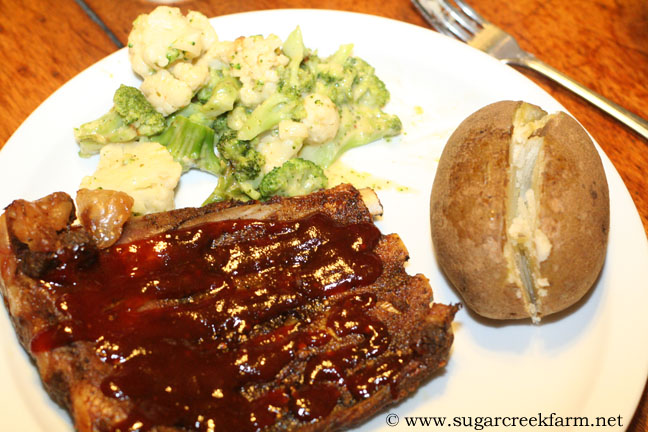
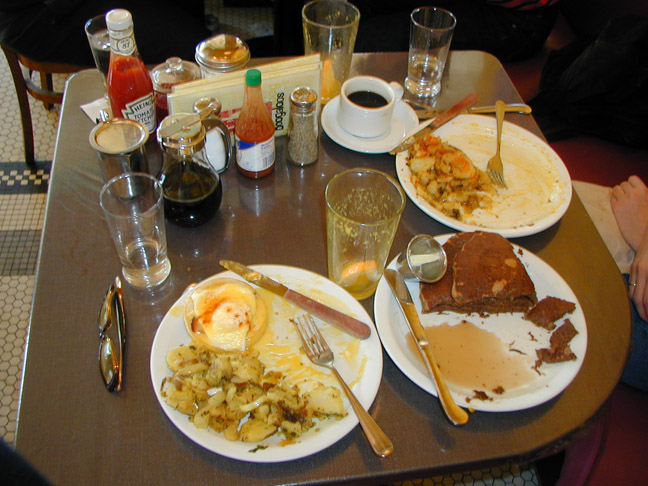
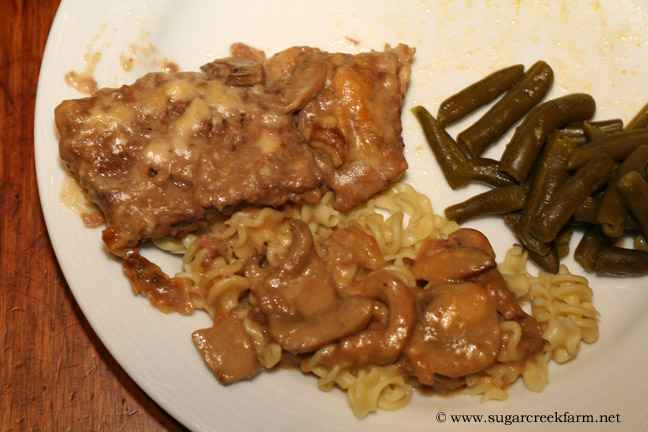
It's all over but the crying now. And the moaning. And the unbuttoning of the pants.

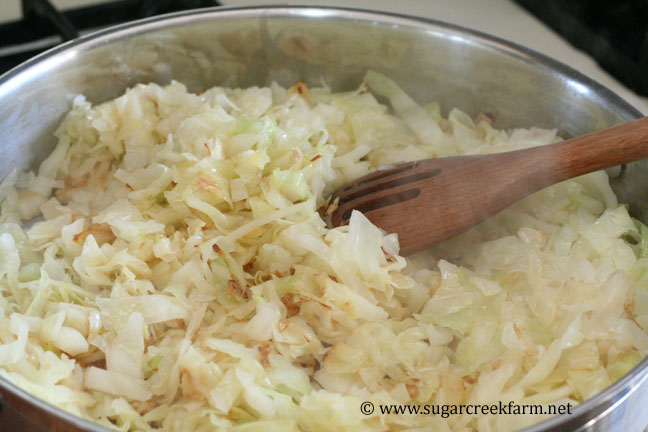
(And I could really use some more vegetables on my plate, but the kids were complaining that they didn't get enough so I had to sacrifice. Because who's going to deny their kids when they ask for more veggies?!?)


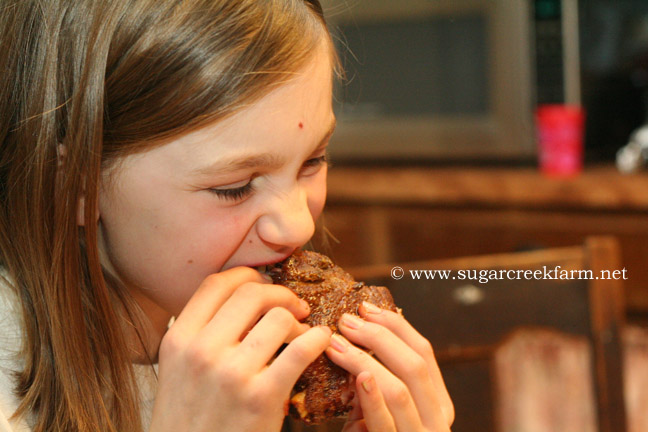
Be sure to have plenty of napkins on hand. Nothing like gnawing your meat off the bone.

How to Cook: Ribs
3 T. brown sugar
2 T. Essence of Emeril
1 T. salt
1 T. ground black pepper
1 T. paprika
1 T. cumin
1 T. garlic powder
1 t. cayenne pepper

Mix together to make the rub. Sprinkle rub on both sides of rib racks and press into meat. Wrap ribs in foil and cook on a cookie sheet at 275 degrees for 4 to 5 hours. Put a pan of water in the oven along with them.

Remove ribs from oven. Discard foil. Coat both sides of ribs with barbeque sauce. Return to oven for 10 to 20 minutes, until sauce is hot and carmelized.


I would think you could also throw the ribs, wrapped in foil or not, into a crockpot and cook them on low for 8 hours.

Labels: